Make perfect air fryer poached eggs every time — no swirling, no vinegar, no stress. Just ramekins, water & 6 minutes. Full doneness chart, troubleshooting guide & serving ideas!

Why this method works when stovetop poaching feels like a gamble: Traditional poaching requires a precise water temperature, a swirling vortex to wrap the whites around the yolk, and often a splash of vinegar to speed coagulation, all while you hover over the pot hoping it doesn’t fall apart. In an air fryer, the egg sits in a small ramekin with a tablespoon of water. The ramekin contains the shape, the water steams the whites gently from below, and the circulating heat sets them from above. No swirling. No vinegar. No fishing around with a slotted spoon. Just a perfectly shaped, tender egg with a yolk exactly as runny as you want it — every single time.
I’ve made poached eggs both ways for years. On the stovetop, I’d get a good result maybe 7 times out of 10 — and the other 3 times I’d end up with wispy whites drifting off in the water, or a yolk that set before I could get the egg out. With the air fryer method, my success rate is 10 out of 10. I test with one egg the first time in a new air fryer to dial in the timing, and then I nail it every batch after that.
Below is everything I’ve learned: the method that works, the exact timing for every yolk preference, the ramekin guide, the hot-water vs. cold-water debate, a full troubleshooting section, and 8 ways to serve them that go well beyond the classic eggs benedict.
If you’re looking for even more Air Fryer Breakfast Recipes, some of my favorites include AIR FRYER SPAM, AIR FRYER HAM AND CHEESE OMELETTE, AIR FRYER BREAKFAST COOKIES, AIR FRYER MUESLI, AIR FRYER PANCAKE CEREAL, and AIR FRYER BREAKFAST CASSEROLE!
Why the Air Fryer Makes Better Poached Eggs Than the Stovetop
This might be the most counterintuitive thing I’ll tell you: the air fryer — a dry-heat appliance — actually makes better poached eggs than a pot of simmering water. Here’s why.
Stovetop poaching is a delicate, active process. You need the water at exactly 180°F (a gentle simmer, not a boil), you need to create a vortex by stirring, you need to crack the egg in precisely, and then you need to time it perfectly while the whites have a tendency to drift. One degree too hot, one second too late pulling them out, and the yolk is gone.
The air fryer is passive and contained. The ramekin holds the egg in a perfect shape automatically. The tablespoon of water in the bottom creates a gentle steam environment inside the ramekin — the steam rises and cooks the whites from all sides at once, while the air fryer’s circulating heat finishes the top. You set a timer, walk away, and come back to a perfectly shaped poached egg that looks like it came from a restaurant kitchen.
Why no vinegar? In stovetop poaching, vinegar (usually white distilled) is added to the water to lower the pH, which causes egg proteins to coagulate faster — this helps the whites wrap around the yolk before they drift away. In the air fryer, the ramekin physically contains the egg, so the whites have nowhere to drift. There’s no need to speed up coagulation because the shape is guaranteed by the vessel. No vinegar means no slight acidic taste, and cleaner-tasting eggs.
Equipment You Need
Ramekins — size and material matter
| Ramekin Type | Size | Result | Recommended? |
|---|---|---|---|
| Ceramic ramekin | 4 oz (ideal) or 6 oz | Retains heat evenly, produces clean egg shape, egg releases well when greased | ✅ Best choice |
| Glass / Pyrex custard cup | 6 oz | Works excellently — conducts heat well, easy to see egg progress, dishwasher safe | ✅ Excellent |
| Silicone egg cup | Any | Does not conduct heat well — whites often underset while yolk overcooks. Inconsistent results. | ⚠️ Not recommended |
| Small oven-safe bowl | 4–6 oz equivalent | Works if oven-safe and not too deep — a deeper bowl means slower, less even cooking | ✅ Acceptable substitute |
The key rule: Use ceramic or glass. Both conduct heat well and create the gentle, even steam environment that perfectly sets the whites without overcooking the yolk. Silicone is an insulator — it resists heat transfer, which is why silicone oven mitts protect your hands but also why silicone ramekins make inconsistent poached eggs.
4 oz ramekins are the sweet spot: they shape a single large egg into a compact, neat round that’s perfect for eggs benedict or avocado toast. A 6 oz ramekin works well but produces a slightly wider, flatter egg. Either is fine — just be consistent so your timing is reliable batch to batch.
Ingredients You’ll Need
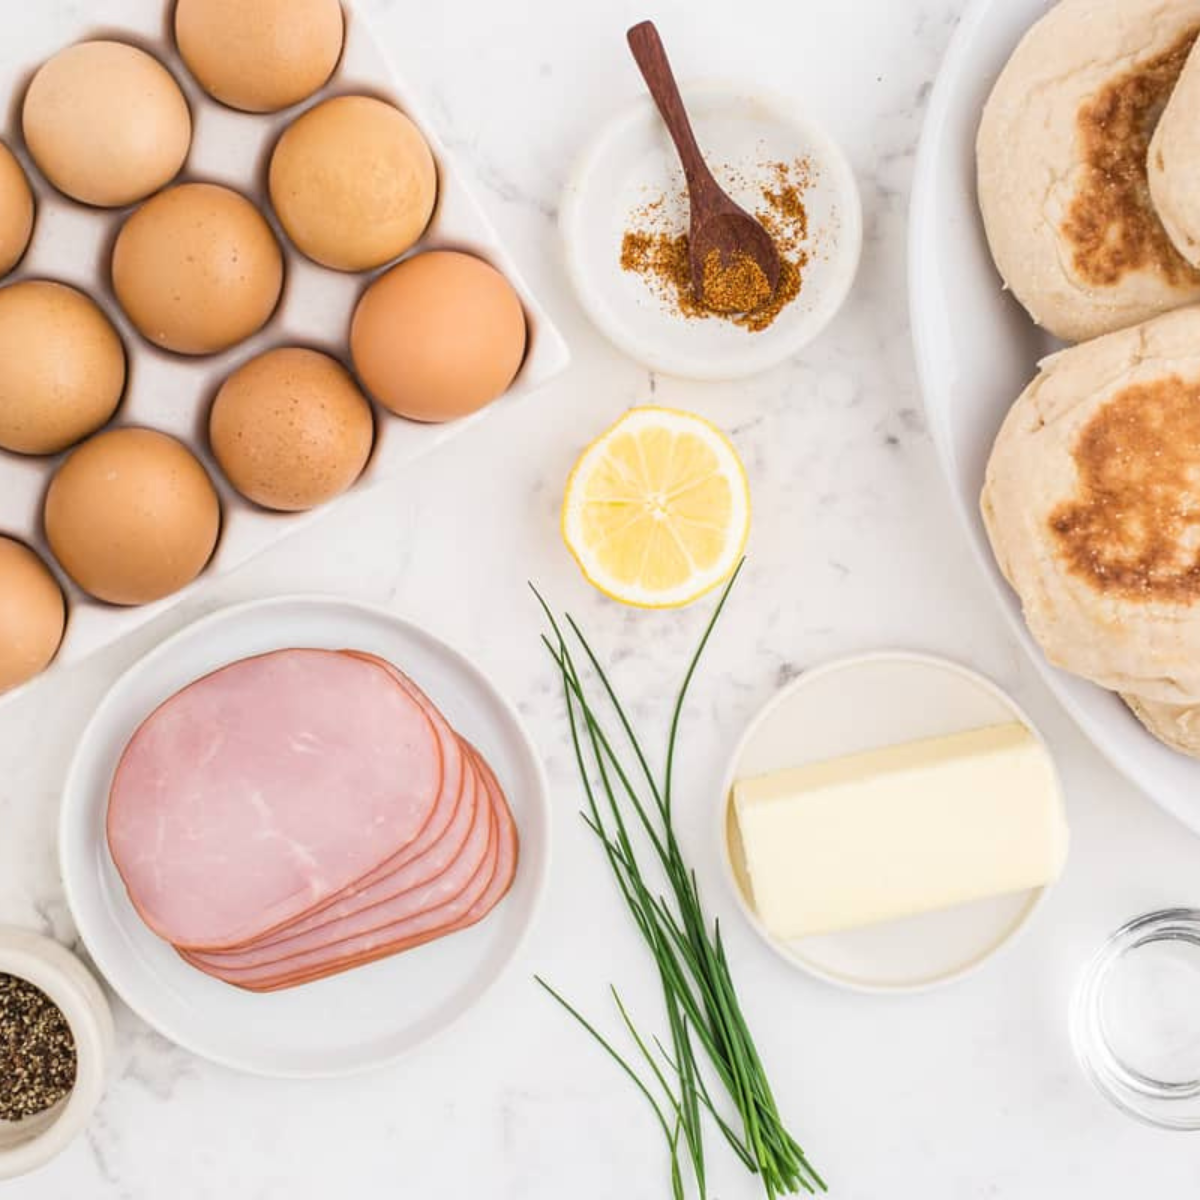
- Large eggs: Fresh is best; the whites of fresh eggs are thicker and hold their shape better than older eggs
- Water: Room temperature or slightly warm (see the hot vs. cold water section below)
- Non-stick cooking spray or a few drops of oil: To grease the ramekins
- Salt and pepper: Added after cooking
- Optional finishing touches: Flaky sea salt, fresh chives, smoked paprika, red pepper flakes, everything bagel seasoning
Egg size timing adjustments
| Egg Size | Adjustment | Notes |
|---|---|---|
| Small / medium | Subtract 1–1.5 minutes | Whites set faster; check at the 4-minute mark for runny yolk |
| Large | Use base recipe times | The standard this recipe is written for |
| Extra-large / jumbo | Add 1–2 minutes | More white volume takes longer to set; yolk is also larger so cook a touch longer for same doneness |
Hot Water vs. Cold Water — Which Method is Better?
This is the most debated detail in every air fryer poached egg recipe, and I’ve tested both extensively. Here’s what I found:
Cold/room-temperature water in the ramekin from the start: The most common method. You spray the ramekin, add 2–4 tablespoons of room-temperature water, crack the egg directly in, and air fry from cold. Total time: 6–8 minutes. The whites set from the outside in as the water heats up during cooking. Result: reliable, consistent, easy.
Pre-heating the water in the ramekin first: Place ramekins with water (no egg) into a preheated 400°F air fryer for 5 minutes to bring the water to a simmer. Then carefully open the fryer, crack the egg into the hot water, reduce temperature to 360°F, and cook for 5–6 minutes. The hot water immediately begins setting the whites from below the moment the egg goes in, which can produce a cleaner, more uniform white. Total time: about 10–11 minutes including preheat. Result: slightly more consistent whites, but longer and more hands-on.
My verdict: The cold water method is faster and nearly as reliable. I use it every time for weekday eggs. I use the pre-heated water method when I’m cooking for guests and want the most precise, restaurant-quality result possible. Both work — pick the one that fits your morning.
Pro tip: Whatever method you use, make sure the water submerges the egg yolk and most of the white. Too little water means the top of the white and the yolk surface are exposed to direct air fryer heat, which dries them out and creates the “crusty top” problem. Aim for the yolk to be just peeking above the water line.
How to Make Air Fryer Poached Eggs — Step by Step
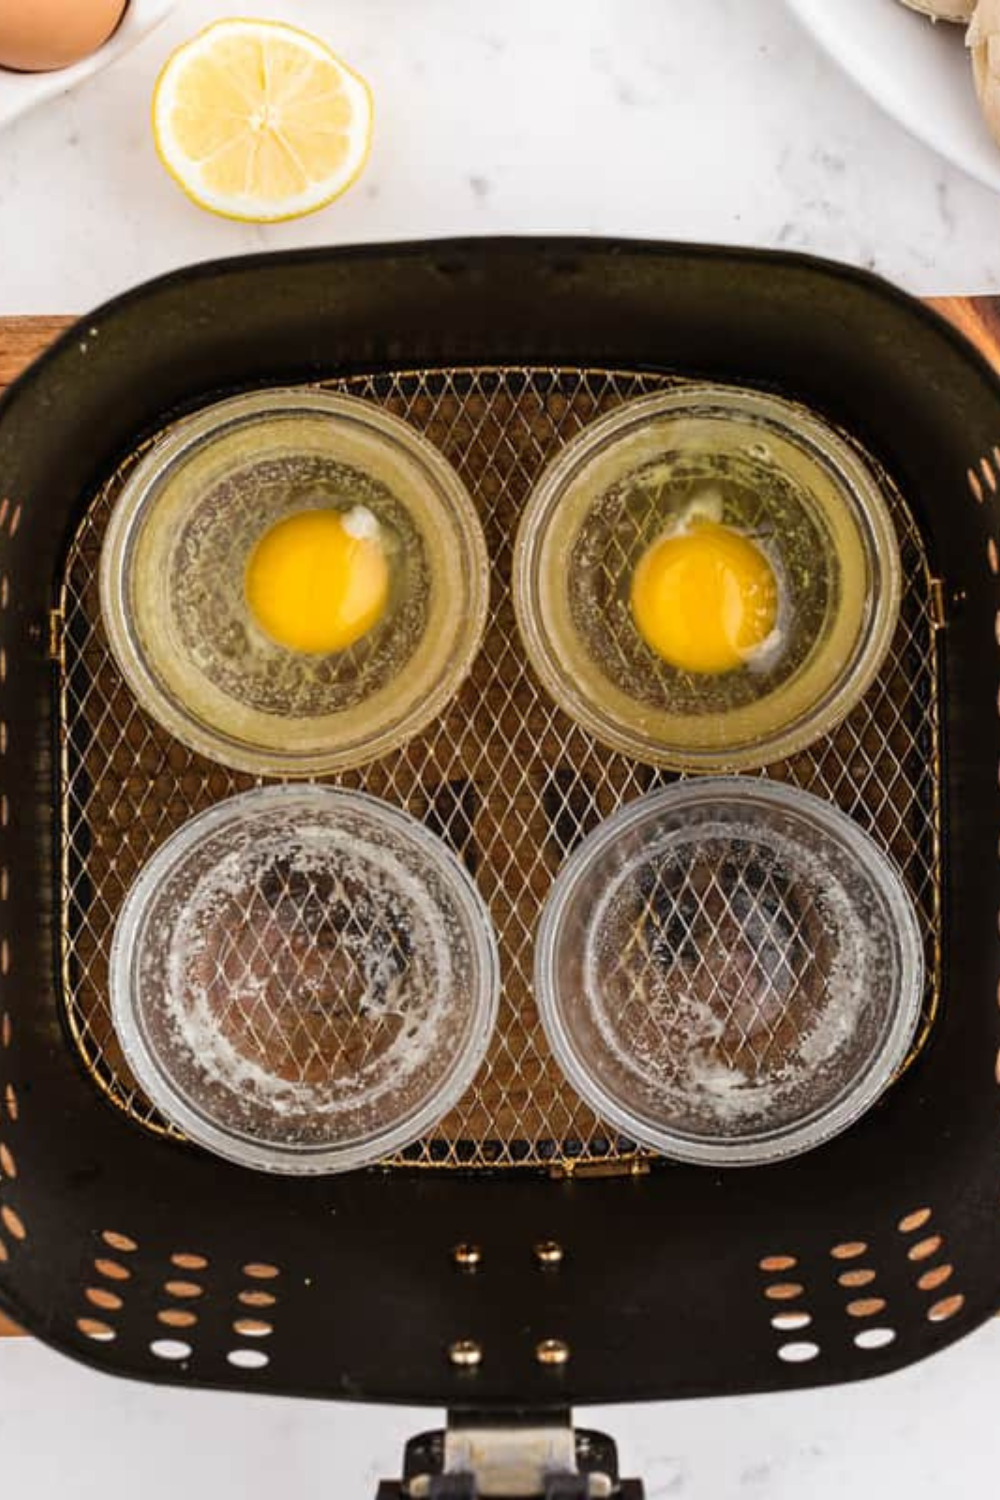
Step 1: Spray the inside of each ramekin generously with non-stick cooking spray, or rub with a few drops of oil using a paper towel. Make sure to coat the sides and bottom thoroughly, this is what allows the egg to slide out cleanly when done. An ungreased or under-greased ramekin is the most common cause of eggs sticking and tearing when removed.
Step 2: Add 3-4 tablespoons (about ¼ cup) of room-temperature or slightly warm water to each ramekin. The water should be deep enough to come about halfway up the side of the ramekin. This creates the steam environment that gently cooks the whites from below without requiring you to cook in a pot of boiling water.
Step 3: Don’t crack the egg directly over the ramekin from height. Instead, crack each egg into a small bowl first, then gently pour it into the water-filled ramekin. This gives you a chance to spot and remove any shell fragments, and allows you to lower the egg into the water gently so the yolk doesn’t break on impact.
Freshness check: The fresher the egg, the tighter the white. If you have eggs that are a week or more old, their whites will be thinner and more likely to spread — you can still use them, but they’ll produce a slightly looser, less compact poached egg. Save your freshest eggs for this recipe.
Step 4: Carefully place the filled ramekins into the air fryer basket. Move slowly and deliberately — the goal is to get them into the fryer without sloshing the water or breaking the yolk. If your air fryer has a rack, you can use it to elevate the ramekins slightly for better air circulation underneath. Most standard basket-style air fryers fit 2–3 four-ounce ramekins at one time.
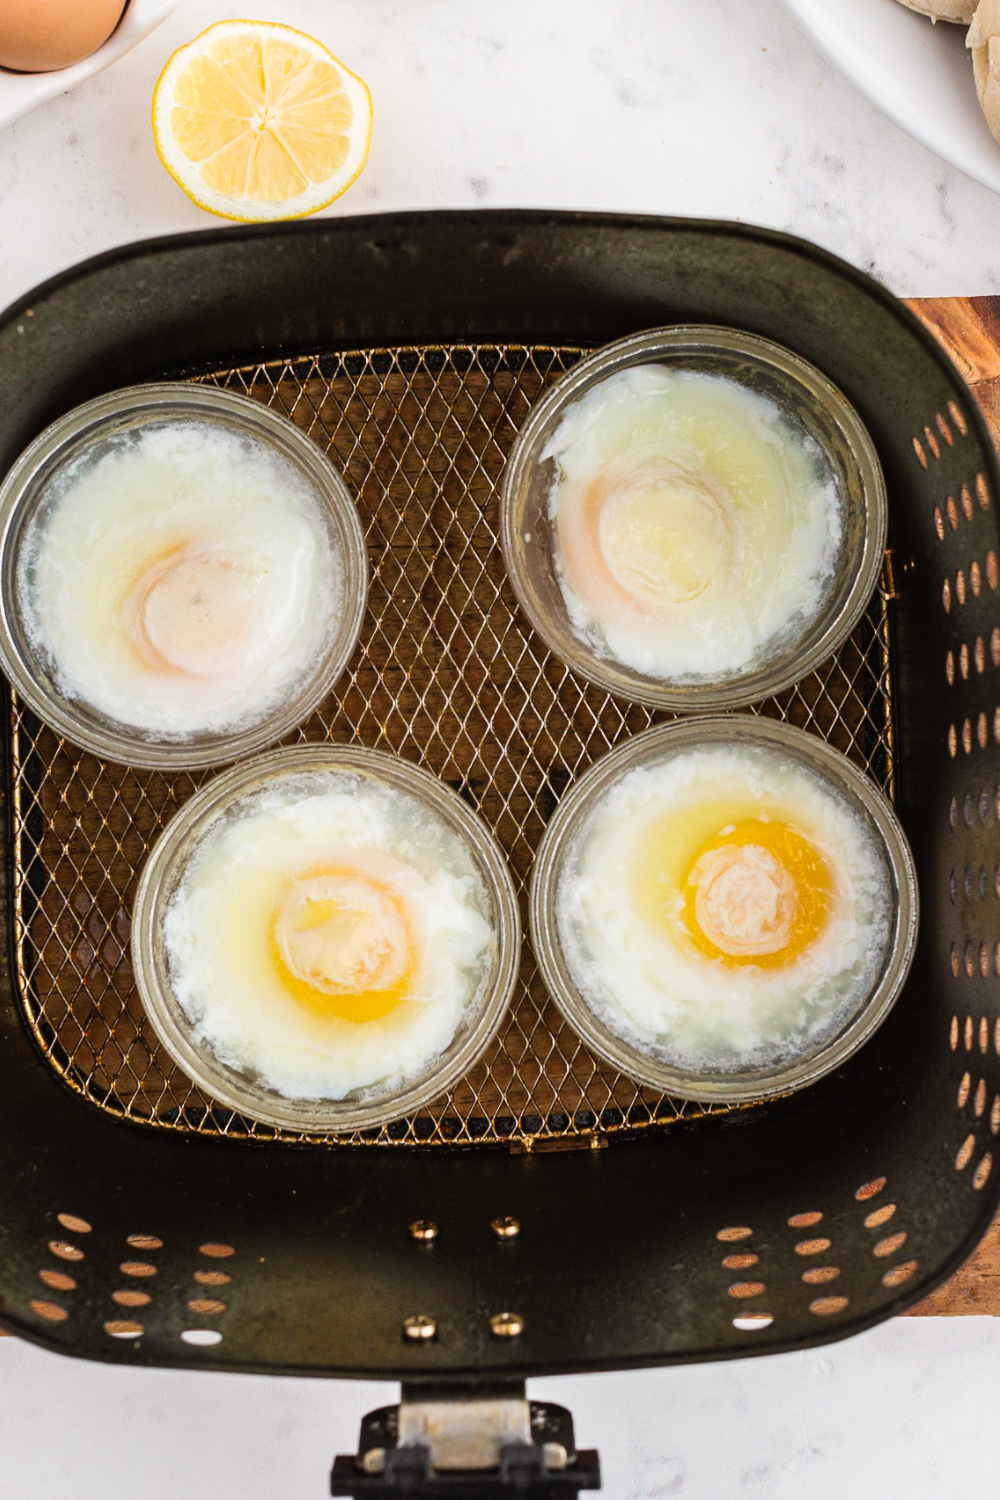
Step 5: Set your air fryer to 360°F (not 400°F — a lower temperature gives the whites more time to set without the yolk overcooking). Cook for the time that matches your preferred doneness from the chart below. Do not open the air fryer more than once to check — each time you open it, heat escapes and extends the cooking time unpredictably. On your first batch in a new air fryer, check at 1 minute before the minimum time.
Air Fryer Poached Egg Doneness Chart
| Doneness | Time at 360°F | Yolk | Whites | Best Served On |
|---|---|---|---|---|
| Very runny | 4–5 minutes | Completely liquid, warm | Just barely set, very soft | Soups, ramen, risotto |
| Runny (classic) | 5–6 minutes | Warm, flowing liquid yolk | Set, tender, silky | Eggs benedict, avocado toast |
| Soft-set | 6–7 minutes | Yolk is jammy — thick but still flows | Fully set, firm but not rubbery | Grain bowls, salads, toast |
| Firm | 8–9 minutes | Mostly set, just slightly soft in center | Fully set and firm | Sandwiches, wraps, meal prep |
| Hard set | 10–11 minutes | Completely set, no flow | Firm throughout | For those who prefer no runny yolk |
All times are for large eggs in a 4–6 oz ceramic or glass ramekin in a basket-style air fryer. Oven-style air fryers may need 1–2 extra minutes. Start with the minimum time on your first batch and adjust from there — your air fryer is the final authority.
Carryover cooking is real even for poached eggs: The hot ramekin continues cooking the egg for 30–60 seconds after you pull it from the air fryer. If you want a runny yolk, pull at 5 minutes and move the egg out of the ramekin immediately — don’t let it sit in the hot ceramic. This is the most common reason for “I followed the timing but the yolk was set” complaints.
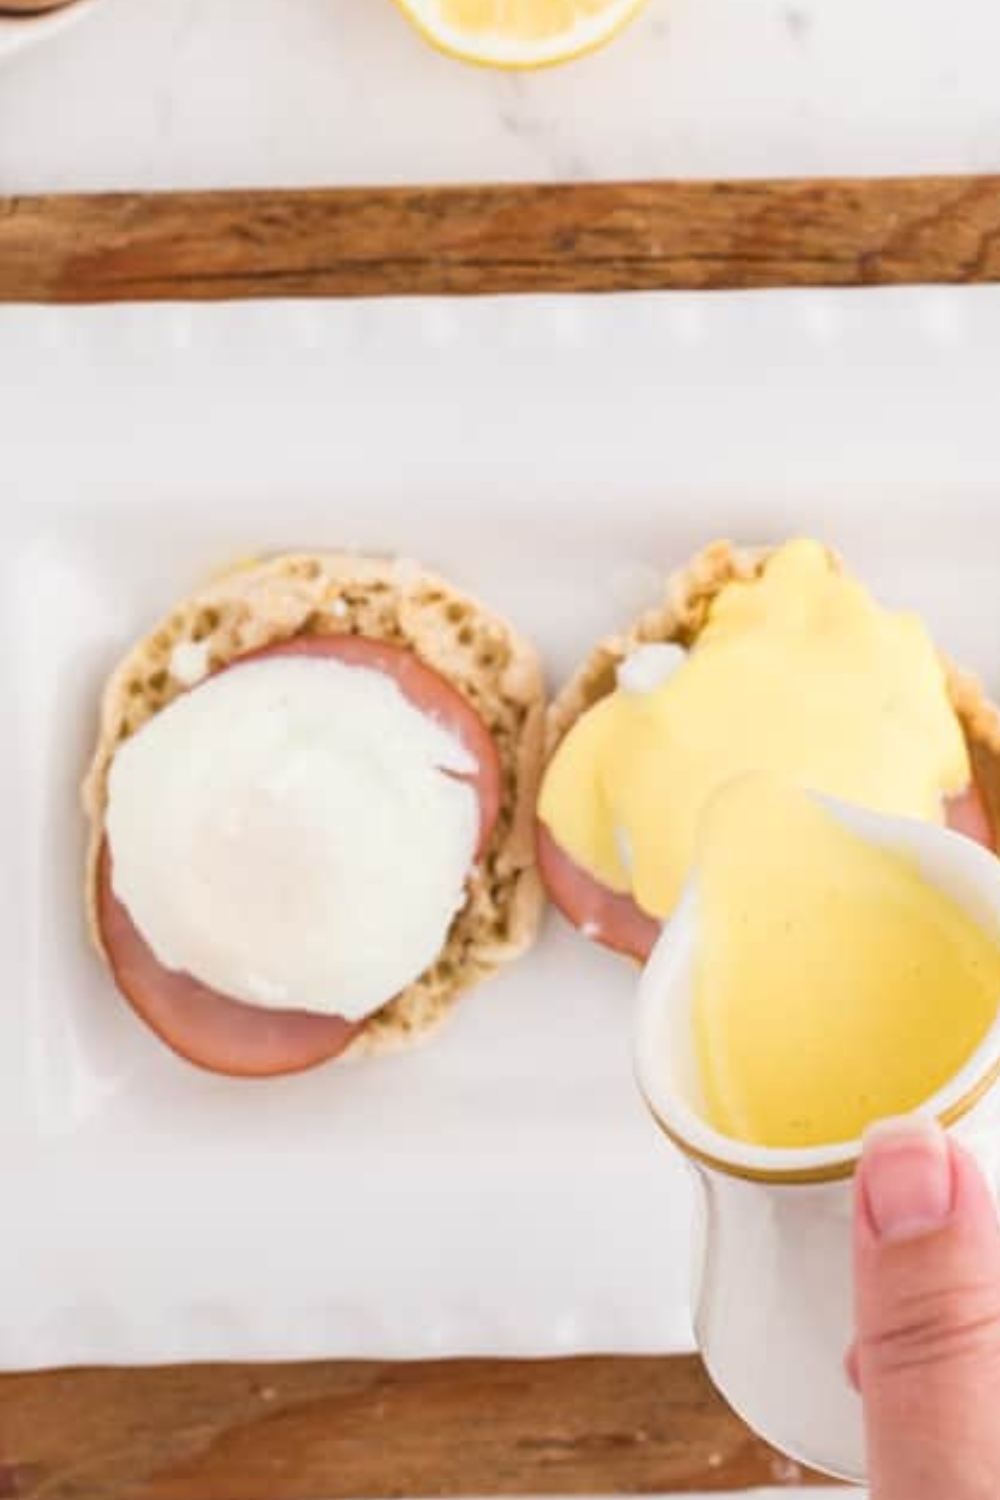
Step 6: Using oven mitts or silicone tongs (the ramekins are extremely hot), carefully lift them from the basket. Run a small silicone spatula or teaspoon around the inside edge of the ramekin to loosen the egg. Hold the ramekin over a slotted spoon or fine-mesh strainer and gently tip it — the egg should slide out cleanly. The strainer catches any excess water and prevents it from pooling on your toast or plate.
Step 7: Poached eggs wait for no one — they cool and continue setting as they sit. Season with a pinch of flaky sea salt and fresh cracked black pepper the moment they’re plated. Serve immediately. If you’re making multiple batches, keep the first batch warm by placing them in a bowl of warm water (not hot) while the next batch cooks.
Troubleshooting: Every Common Problem Solved
| Problem | Cause | Fix |
|---|---|---|
| Egg sticks to the ramekin | Insufficient greasing | Spray every part of the ramekin — sides and bottom — before adding water. Add an extra coat if you have a batch that tends to stick. Run a silicone spatula around the edge before trying to remove. |
| Crusty, dried white on top | Not enough water — yolk and white surface exposed to dry air fryer heat | Increase water to ¼ cup (4 tablespoons) so the water level nearly covers the egg. The yolk should just peek above the surface. |
| Yolk overcooked / set too firm | Too long in the air fryer OR left in the hot ramekin after cooking | Pull 1–2 minutes earlier and immediately remove egg from the ramekin. Reduce temperature to 350°F if your air fryer runs hot. |
| Whites not set / undercooked | Not enough time, or air fryer temperature is lower than displayed | Add time in 1-minute increments. Try the pre-heated water method for more reliable white setting. |
| Egg yolk breaks when cracking in | Cracking egg directly from height into ramekin | Always crack into a small bowl first, then gently slide into the water-filled ramekin. |
| Watery whites (thin, spread out) | Old eggs with thin whites | Use the freshest eggs you can find. The chalaza (the white rope-like strands attached to the yolk) should be prominent in fresh eggs. Older eggs have thin, watery whites that don’t hold a shape as well. |
| Uneven cooking between batches | Different ramekin sizes or materials in the same batch | Use matching ramekins for each batch. Different sizes and materials conduct heat differently, producing inconsistent results in the same cook. |
| Results vary batch to batch | Egg temperature — refrigerator cold vs. counter temp | Cold eggs take slightly longer than room-temperature eggs. If you pull eggs straight from the fridge, add 30–60 seconds to the cooking time. |
8 Ways to Serve Air Fryer Poached Eggs
- Grain & Veggie Bowl: Cook farro, quinoa, or brown rice until tender. Add roasted vegetables and a drizzle of tahini or miso dressing. Top with a poached egg and let the yolk run into the grains.
- Ramen or Noodle Soup: Prepare hot ramen, pho, or noodle soup. Slide in a soft poached egg just before serving. Let the yolk melt into the broth for a rich finish.
- Steak & Eggs: Cook steak bites or sliced steak and plate them hot. Add a poached egg on top so the yolk runs over the meat. Finish with chives, salt, and pepper.
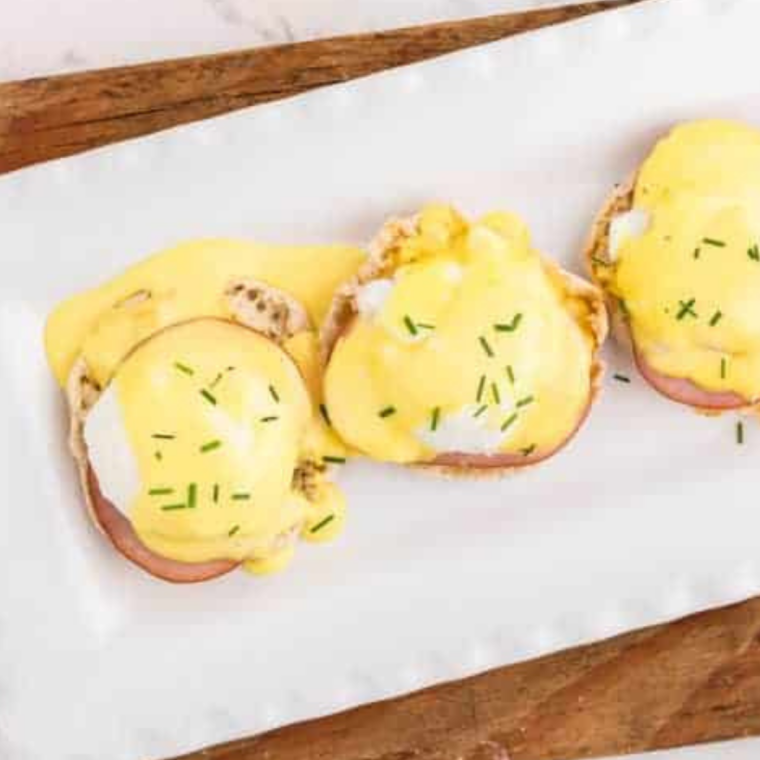
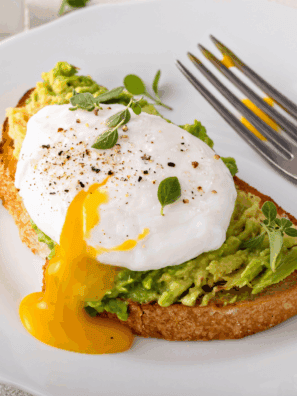
- Florentine Style: Toast bread until crisp and lightly golden. Add buttery sautéed spinach seasoned with a pinch of nutmeg. Top with a poached egg and spoon over hollandaise.
- Salad Topper: Toss greens with vinaigrette and your favorite toppings. Add a warm poached egg over the salad. Break the yolk so it blends into the dressing like a sauce.
Make-Ahead & Storage
Poached eggs are best eaten immediately — the whites continue to set as they cool and the yolk can firm up unexpectedly if left too long. That said, you can make them ahead with the right technique:
- Ice bath method (up to 2 days): As soon as each egg is done, slide it into a bowl of ice water for 1–2 minutes. This stops the cooking process completely and holds the egg at your desired doneness. Transfer to an airtight container filled with cold water and refrigerate for up to 2 days.
- To reheat: Bring a small pot of water to a gentle simmer (not boiling). Slide the cold poached egg into the water for 1–2 minutes until just warmed through. Remove with a slotted spoon, pat dry, and serve immediately. This is the method professional kitchens use to batch-cook poached eggs for brunch service.
- Freezing: Not recommended. The whites become rubbery and watery when frozen and thawed, and the yolk texture is irreversibly changed.
Air Fryer vs. Stovetop Poached Eggs — Side by Side
| Factor | Air Fryer Method | Stovetop Method |
|---|---|---|
| Skill required | Beginner-friendly | Intermediate — requires practice |
| Active time | 2 min hands-on, then walk away | Constant attention throughout |
| Consistency | Very high — same result every time | Variable — depends on water temp, egg freshness, technique |
| Batches | 2–3 eggs at once (ramekin limit) | Up to 4 at once in a wide pan |
| Vinegar needed | No | Optional but recommended |
| Egg shape | Compact round (ramekin shape) | More irregular, frilly edges |
| Total time | 6–8 minutes | 4–5 minutes (but prep adds time) |
| Cleanup | 2 ramekins to wash | One pot + slotted spoon |
Frequently Asked Questions
How long do you poach eggs in an air fryer? At 360°F in a ceramic or glass ramekin with ¼ cup of water: 5–6 minutes for a runny yolk, 6–7 minutes for a soft-set jammy yolk, 8–9 minutes for a firm yolk, and 10–11 minutes for a fully set hard yolk. Always check at the minimum time first — air fryer brands vary in wattage and actual cooking temperature. Pull the egg 30 seconds early and let carryover cooking finish it in the ramekin.
Do you need vinegar to make air fryer poached eggs? No — and this is one of the biggest advantages of the air fryer method. Vinegar is used in stovetop poaching to speed up protein coagulation in the whites, keeping them from spreading in the open water. In the air fryer, the ramekin physically contains the egg, so the whites have nowhere to drift. No vinegar means no subtle acidic flavor in the finished egg.
What size ramekin do I need for air fryer poached eggs? A 4 oz ceramic or glass ramekin is ideal — it shapes a large egg into a neat, compact round. A 6 oz ramekin works but produces a slightly wider, flatter egg. Avoid silicone egg cups for this method — silicone is an insulator that doesn’t conduct heat well, resulting in unevenly cooked whites. Use ceramic or glass only.
Why are the tops of my poached eggs crusty or dried out? Not enough water in the ramekin. The top of the egg white and the yolk surface are exposed directly to the air fryer’s dry circulating heat, which dries them out before the bottom whites have set. Increase the water to ¼ cup (4 tablespoons) per ramekin. The water level should nearly cover the egg — the top of the yolk can peek above the surface, but the white should be fully submerged.
Why did my egg stick to the ramekin? Insufficient greasing. Spray the entire inside of the ramekin — sides and bottom — before adding water. Use a non-stick cooking spray or rub a few drops of oil along every surface with a paper towel. Even a small ungreased spot can cause the egg to grip the ceramic. If the egg is sticking despite greasing, run a small silicone spatula gently around the full inside edge before trying to remove it.
Can I make multiple poached eggs at once in the air fryer? Yes — as many ramekins as fit in a single layer in your basket. Most standard 5–6 qt basket air fryers fit 2–3 four-ounce ramekins comfortably. Don’t stack or crowd the ramekins — air circulation is what cooks the eggs evenly. For larger batches, work in sequential rounds. You can keep the first batch warm in a bowl of warm water while the second batch cooks.
Should I use hot water or cold water in the ramekin? Both work. Room-temperature or slightly warm water is the easiest and most common method — add water and the egg together and cook. Pre-heating the water in the ramekin first (5 minutes at 400°F before adding the egg) produces a slightly more uniform white because the water is already steaming when the egg goes in. The pre-heated method adds 5 minutes of total time. For weekday eggs, cold water is fine. For brunch guests, try the pre-heated method.
Can I use an air fryer oven instead of a basket-style air fryer? Yes, but you may need to add 1–2 minutes to the cooking time. Oven-style air fryers (like the Ninja Foodi oven or Cuisinart TOA series) distribute heat slightly differently than basket-style fryers — the heating element is above rather than below/surrounding the basket. Place ramekins on the middle rack and start checking 1 minute before the minimum time listed in the recipe.
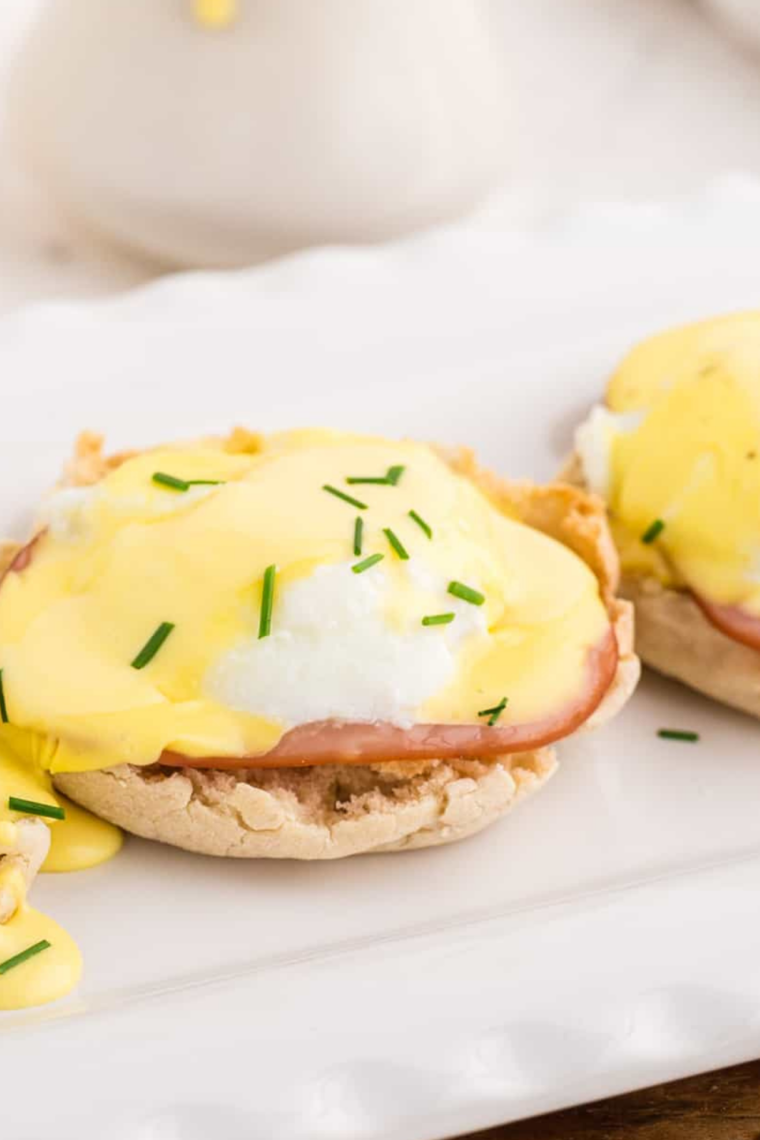
Can I poach eggs in the air fryer for eggs benedict? Absolutely — this is actually the best use case for the method. The ramekin produces the neat, compact round shape that looks beautiful on an English muffin. While the eggs are cooking (5–6 minutes at 360°F), blend your hollandaise (3 egg yolks + hot melted butter + lemon juice in a blender — 30 seconds total). Toast your muffins and warm your Canadian bacon in the air fryer before the eggs go in. Everything finishes at almost exactly the same time.

More Easy Air Fryer Breakfast Recipes
- AIR FRYER BREAKFAST EGG ROLLS
- AIR FRYER BARN YARD BUSTER WRAP
- AIR FRYER HAM AND CHEESE BITES
- AIR FRYER FROZEN QUICHE
- AIR FRYER SCONES
- AIR FRYER BAGEL BREAKFAST SLIDERS
- AIR FRYER MEAT LOVER’S QUICHE
Don’t Forget To Pin!
Share Your Creations! Are you active on Facebook? Join our Air Fryer Recipes Group, where hundreds of thousands of Air Fryer enthusiasts gather and share your photos! I’m always thrilled to see what you’ve made. For those on Instagram, don’t forget to tag me @forktospoon – I can’t wait to admire your culinary adventures!

Air Fryer Poached Eggs
Description
Ingredients
- 3 large eggs, 1 per ramekin
- 3 water, room-temperature water per ramekin
- Salt and freshly cracked black pepper, to taste
- Flaky sea salt, fresh chives, smoked paprika, everything bagel seasonin
Instructions
- Spray or oil the inside of each ramekin thoroughly — sides and bottom. Don’t skip any spots; even a small ungreased area can cause sticking.
- Pour ¼ cup (3–4 tablespoons) of room-temperature water into each greased ramekin. The water should be deep enough to nearly submerge the egg once it’s added.
- Crack each egg into a small bowl first, then gently slide it into the water-filled ramekin. This prevents shell fragments and lets you lower the egg in carefully without breaking the yolk.
- Carefully place the filled ramekins into the air fryer basket in a single layer, moving slowly to avoid sloshing. Do not stack or crowd the ramekins.
- Cook at 360°F for 5–6 minutes for a runny yolk (classic), 6–7 minutes for soft-set, or 8–9 minutes for firm. Do not open the air fryer more than once; heat escapes and extends timing. On your first batch, check 1 minute before minimum time.
- Using oven mitts, carefully remove ramekins from the basket. Run a silicone spatula around the inside edge to loosen. Hold over a slotted spoon and gently tip the ramekin to slide the egg out. The strainer drains excess water before plating.
- Season with salt and pepper. Serve immediately on toast, over greens, in eggs benedict, or on any dish that calls for a poached egg. Do not let it sit — the hot egg continues cooking as it rests.
Equipment
- Cooking Spray
- Muffin Tin or Small Ramekins
Notes
| Doneness | Time at 360°F | Yolk texture |
|---|---|---|
| Very runny | 4–5 min | Completely liquid, warm |
| Runny (classic) | 5–6 min | Flowing liquid yolk — perfect for eggs benedict |
| Soft-set / jammy | 6–7 min | Thick, flowing but not runny — great for bowls |
| Firm | 8–9 min | Mostly set, slightly soft center |
| Hard set | 10–11 min | Completely set, no flow |
Nutrition
Share this recipe
We can’t wait to see what you’ve made! Mention @forktospoon or tag #forktospoon!


Cecelia
Thank you for the great recipes!
Cecelia
Recipes are great!
Pete
Just tried this and really impressed. Thank you
Scott
The easiest poached eggs I ever had and it’s fast