Shatteringly crispy outside, impossibly juicy inside — the secret is an overnight dill pickle brine that transforms ordinary chicken into something extraordinary.

These Air Fryer Pickle Brined Chicken Tenders are, without question, the juiciest, most flavorful chicken tenders I’ve ever made at home. The secret isn’t a complicated spice blend or fancy technique, it’s dill pickle juice sitting in your refrigerator right now, just waiting to be put to work.
I started making these years ago when my son (a devoted Chick-fil-A fan) was devastated to find them closed on a Sunday. I knew the restaurant’s famously juicy chicken wasn’t a coincidence, pickle juice is the open secret. So I tested, tweaked, and air-fried my way to a tender that genuinely rivals the real thing. The air fryer gets the exterior audibly crunchy while the brine keeps the inside moist through every single cook.
If you’ve been throwing away your pickle juice, today that stops. Pour it over chicken, brine overnight, and prepare to be amazed.
⭐ Why This Recipe Works
The vinegar in pickle brine is mildly acidic — it gently breaks down the muscle fibers in the chicken without turning it mushy, resulting in meat that stays tender and juicy even in the high heat of an air fryer. It also seasons the chicken from the inside out, so you get flavor in every bite, not just on the surface.
Why Pickle Brine Makes the Best Chicken Tenders
You might be skeptical. Pickle juice on chicken? Trust me — once you try it, you’ll never go back to a plain marinade. Here’s the science behind why it works so well:
- Tenderizes from the inside out. The acidity in vinegar-based brine gently breaks down tough muscle fibers, giving you chicken that’s tender and never rubbery.
- Seasons deeply. Salt in the brine doesn’t just sit on the surface — it penetrates the meat over time, delivering flavor throughout rather than just in the coating.
- Locks in moisture. Brined chicken holds onto its natural juices during the high heat of air frying. The result is a tender that’s juicy in the center even when the exterior is crispy.
- Adds a subtle, complex tang. You won’t bite into these and think “pickle” — you’ll taste a savory depth and a brightness that makes the chicken pop without tasting sour.
- It’s free. You’re literally using liquid you’d otherwise pour down the drain. Zero waste, maximum flavor.
How Long Should You Brine? (Time Guide)
| Brine Time | Result | Best For |
|---|---|---|
| 30 minutes | Mild tang, slightly more moist than un-brined | Last-minute weeknight dinner |
| 2–4 hours | Noticeable flavor, juicier texture | Same-day cooking planned in the morning |
| 6–12 hours | Deep flavor, very juicy, pronounced tenderness | Soak before work, cook at dinner |
| 24 hours ⭐ Recommended | Maximum juiciness, deeply seasoned, incredibly tender | Overnight brine for next-day cooking |
⚠️ Don’t go past 24 hours. While the brine is gentle, leaving the chicken in acidic liquid for too long can start to break down the texture too much, making it slightly mushy rather than tender. 24 hours is the sweet spot.
Ingredients You’ll Need
This recipe uses a short, pantry-friendly ingredient list. The magic is in the technique, not a long shopping trip.
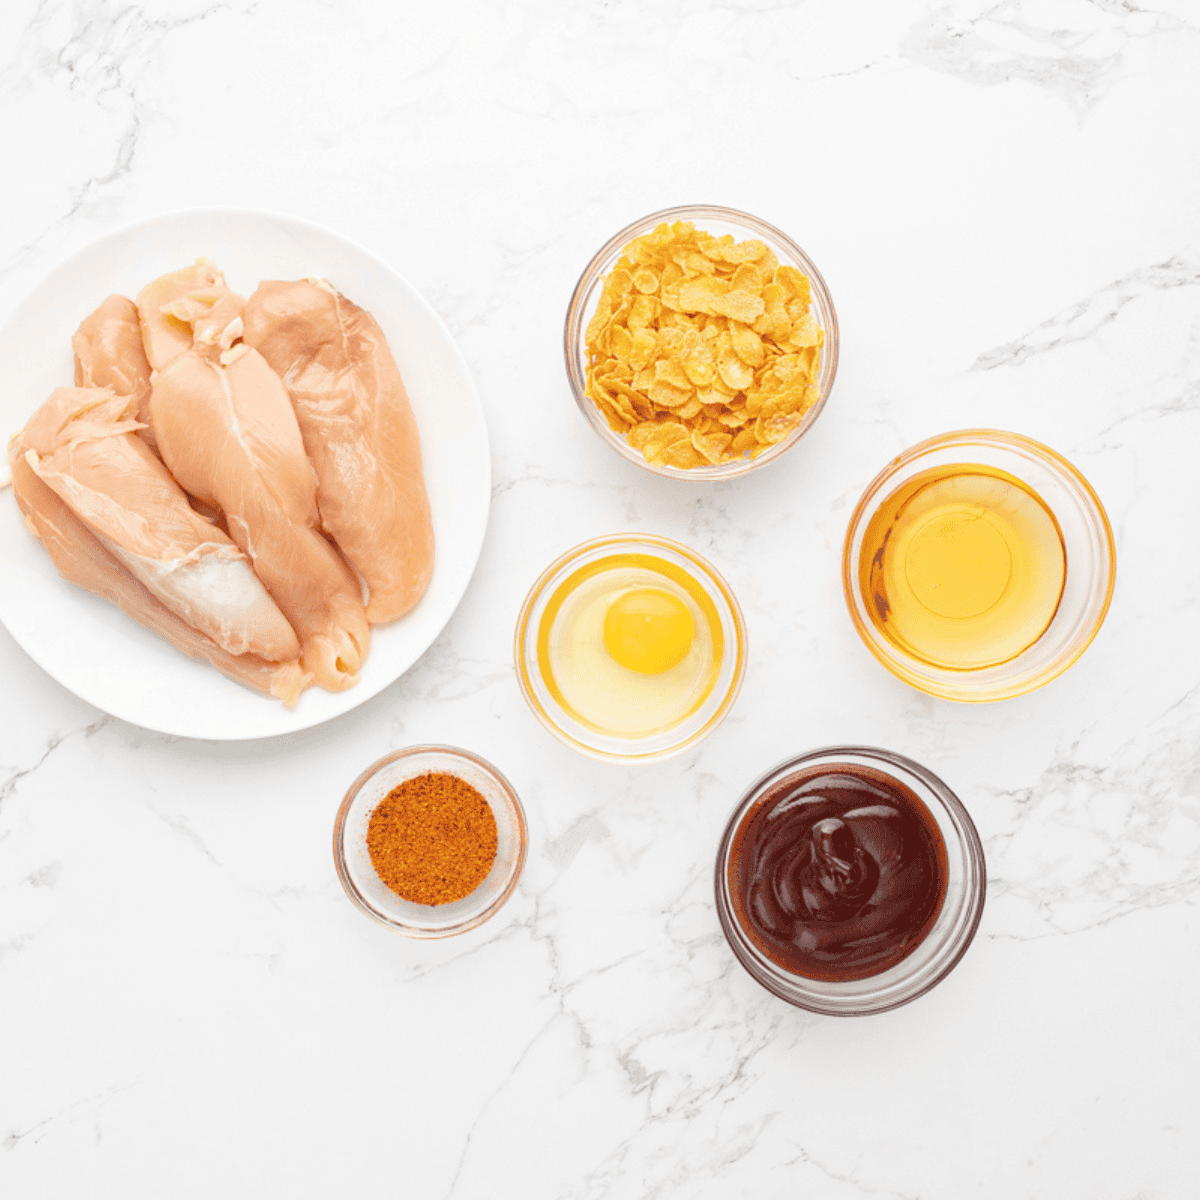
- Chicken tenders: Fresh, boneless. Chicken breasts cut into strips also work perfectly.
- Dill pickle brine: Straight from the jar. Enough to submerge the tenders.
- All-purpose flour: Creates the base layer for breading to stick.
- Eggs: The binding agent between flour and breadcrumbs.
- Panko breadcrumbs: Panko gives a far crunchier crust than regular breadcrumbs. Don’t swap this out.
- Paprika: Adds color and mild smokiness to the coating.
- Garlic powder: Savory backbone in the breading.
- Onion powder: Rounds out the seasoning blend.
- Black pepper: Adds mild heat and balance.
- Salt: Enhances all other flavors in the coating.
Panko vs. Regular Breadcrumbs — Does It Matter?
Yes, significantly. Panko breadcrumbs are coarser and drier than Italian breadcrumbs, which means they create more surface area and shatter into a more audible crunch when you bite in. If you only have Italian-seasoned breadcrumbs on hand, you can use them — just skip the additional salt and reduce the other seasonings slightly since Italian breadcrumbs are already seasoned.
How to Make Air Fryer Pickle Brined Chicken Tenders
Step 1: Place the chicken tenders in a shallow dish or zip-lock bag and pour the dill pickle brine over them, making sure every tender is fully submerged. Cover tightly and refrigerate for at least 6 hours, ideally overnight (up to 24 hours). This is the single most important step, do not skip it or rush it.
Step 2: Remove the tenders from the brine and lay them on a paper towel-lined plate. Pat each one thoroughly dry on all sides. This step is critical — any excess moisture on the surface will steam the coating instead of crisping it, and you’ll end up with a soggy crust. Take your time here.
Step 3: Preheat your air fryer temperature to 400°F (200°C) for 5 minutes. A hot basket from the start means the breading begins crisping immediately, this is what gives you that restaurant-style crunch.
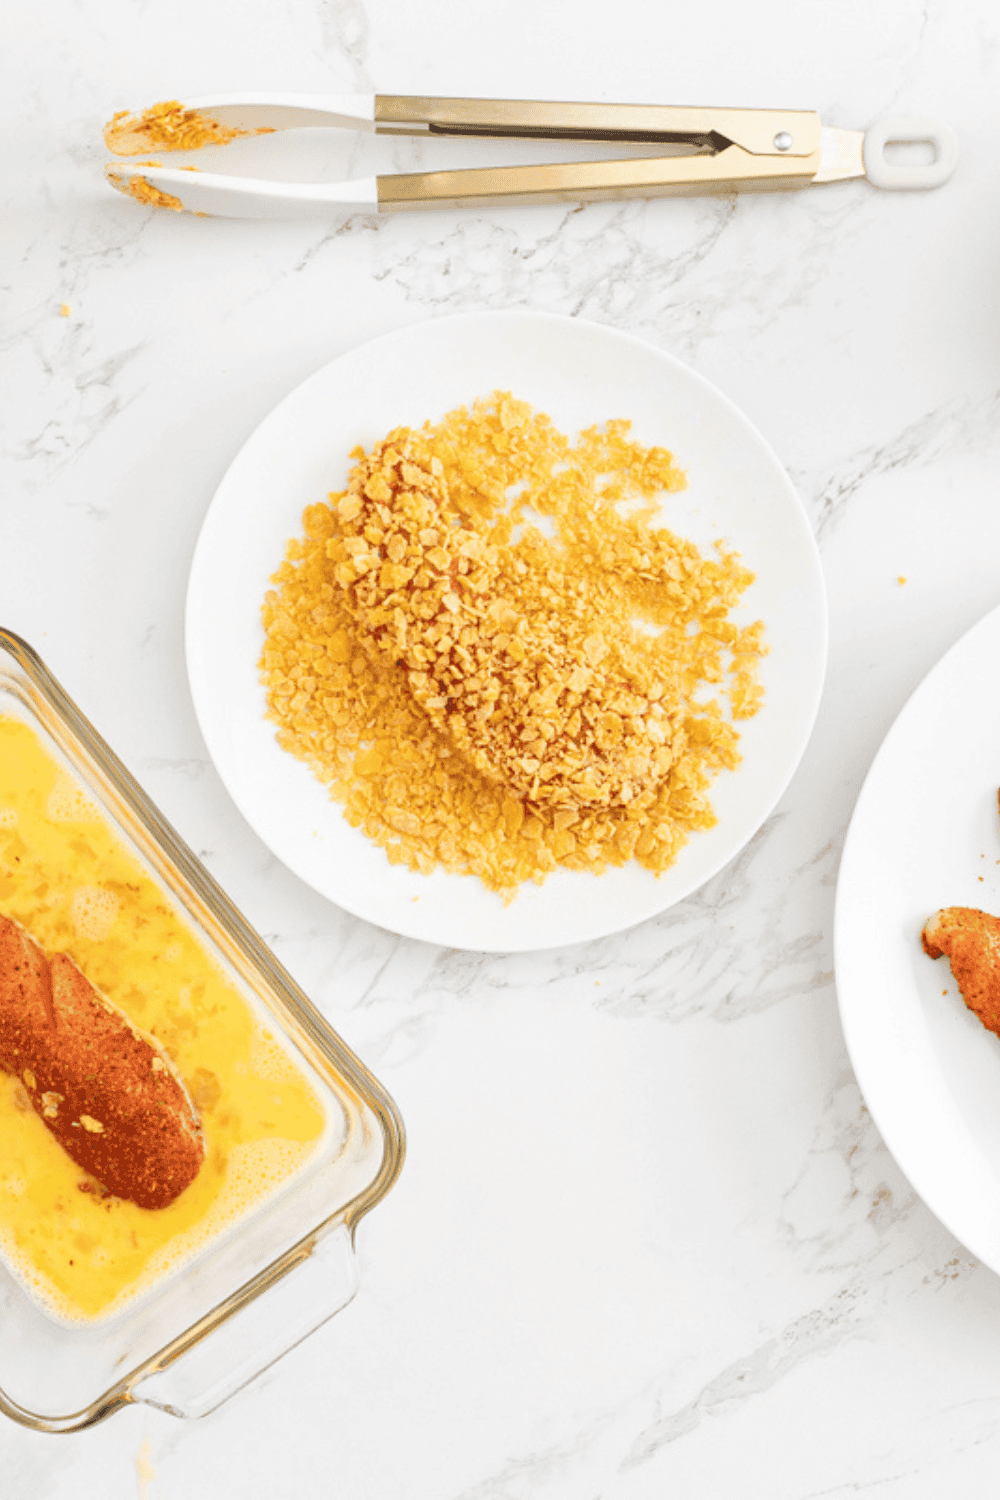
Step 4: Arrange three shallow dishes in a row: Dish 1: all-purpose flour; Dish 2: beaten eggs; Dish 3: panko breadcrumbs mixed with paprika, garlic powder, onion powder, salt, and black pepper. Stir the seasoned panko well so the spices are evenly distributed.
Step 5: Working one at a time, coat each tender in flour (shake off any excess), dip it in the beaten egg (let the excess drip off), then press it into the seasoned panko, coating all sides firmly. Place the breaded tenders on a clean plate and repeat.
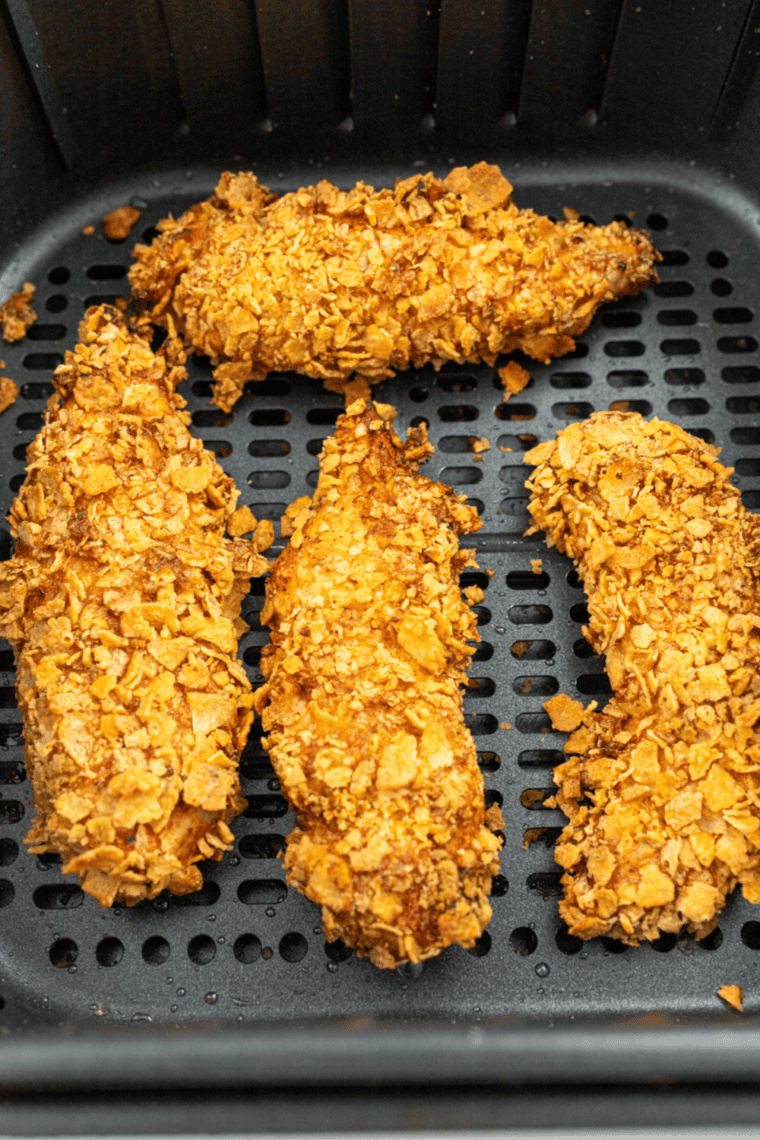
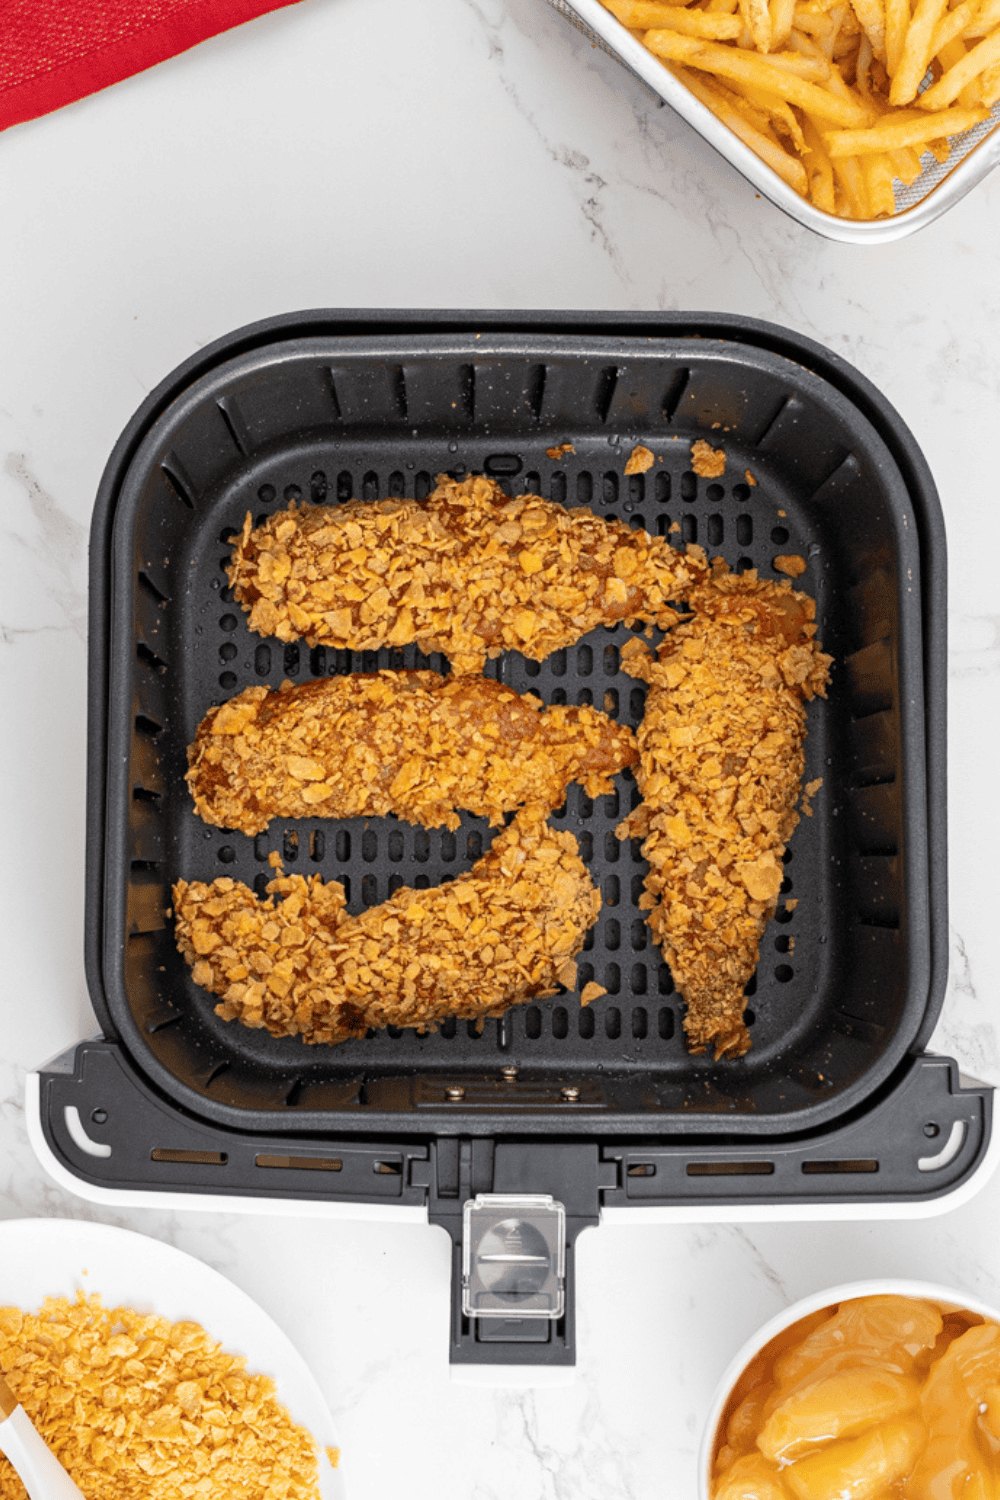
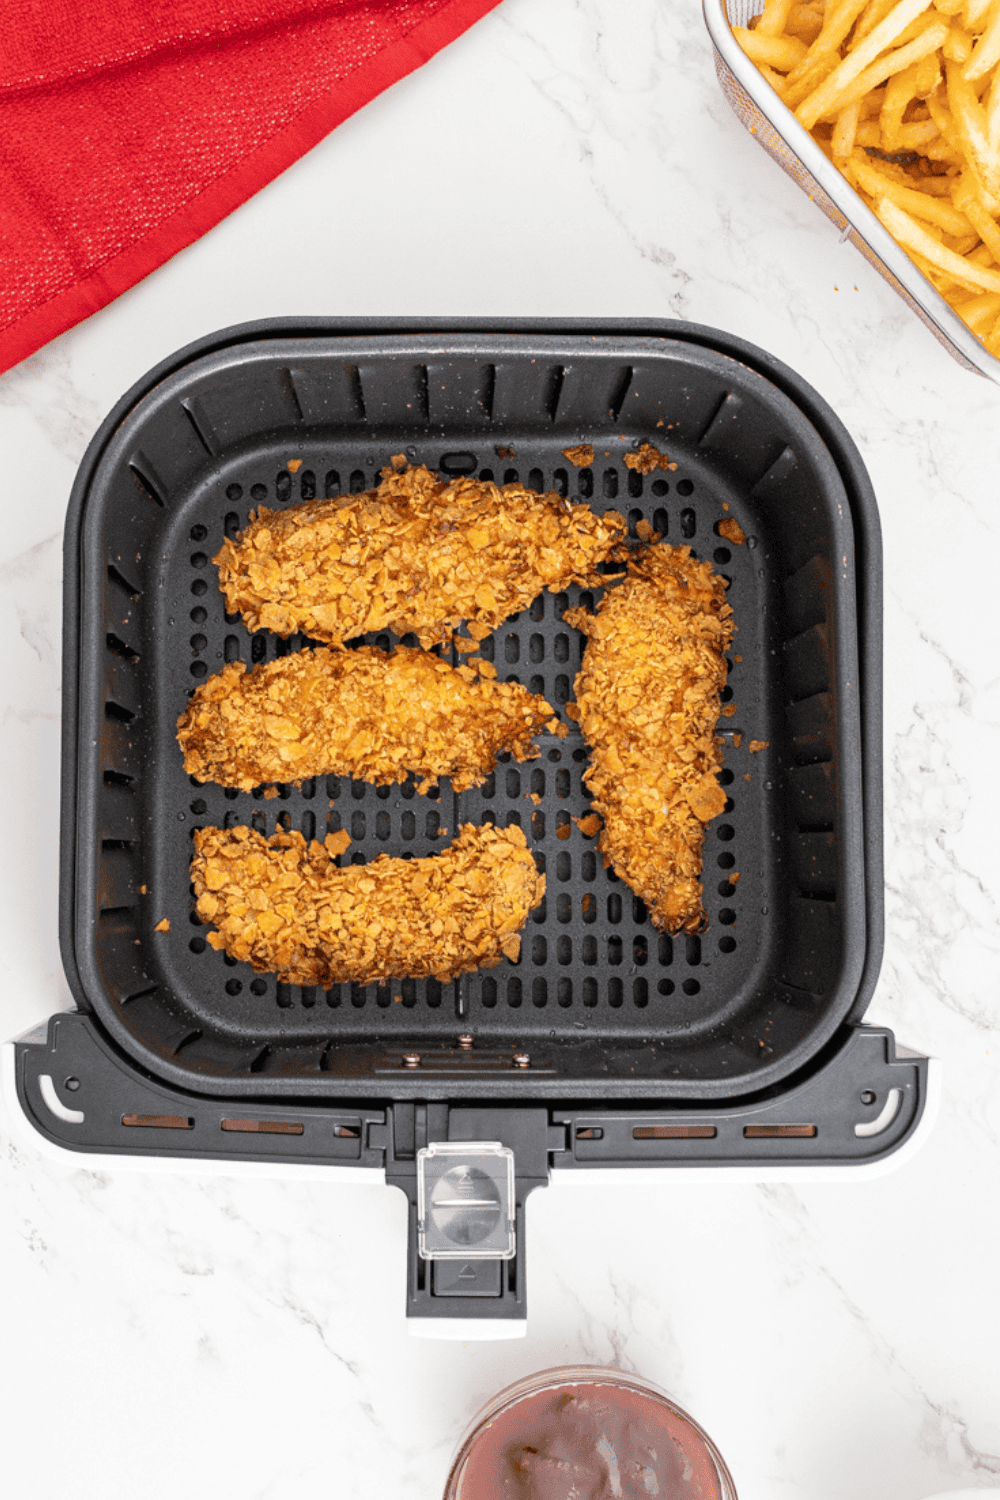
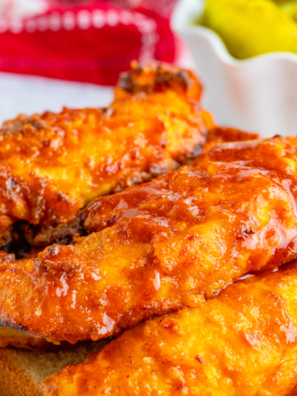
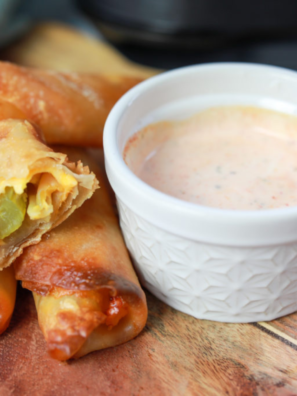
Step 6: Lightly spray the air fryer basket with cooking spray. Arrange tenders in a single layer, do not stack or overlap. Spray the tops of the tenders generously with cooking spray. Cook at 400°F for 5-6 minutes, flip each tender, spray the tops again, and cook for another 5-6 minutes until golden brown and crispy.
Step 7: Use an instant-read meat thermometer to confirm the internal temperature has reached 165°F (74°C). Let the tenders rest for 2-3 minutes before serving, this allows the juices to redistribute so they don’t all run out when you bite in.

Pro Tips for the Crispiest Chicken Tenders
- The longer the brine, the better the tender. 30 minutes gives you a hint of flavor. 24 hours gives you chicken that tastes like it came from a restaurant. Plan ahead whenever you can.
- Dry the chicken obsessively. Moisture is the enemy of crispiness. Use multiple paper towels and press firmly. Some cooks even let the patted-dry tenders sit uncovered on a rack in the fridge for 30 minutes before breading.
- Spray, don’t dip in oil. Misting the tenders with cooking spray creates a thin, even oil coating across all the nooks and crannies of the panko. Dipping or brushing tends to flatten the crumbs and creates uneven spots.
- Never overcrowd the basket. Each tender needs hot air circulating all around it. Work in two or three batches if needed — it’s worth the extra time.
- Press the panko on firmly. When coating with breadcrumbs, use your fingers to press them into the surface. Loose crumbs fall off in the air fryer and never get as crispy as crumbs that are really adhered.
- Use a thermometer, not a timer. Air fryer models vary significantly. An instant-read thermometer removes all guesswork and ensures your chicken is perfectly cooked every time.
- Let them rest. Just 2–3 minutes of resting time lets the juices redistribute. Skip this and you’ll lose all that precious moisture in the first bite.
Variations & Substitutions
This recipe is endlessly adaptable. Here are some of my favorite ways to switch it up:
- 🌶️ Spicy Pickle Tenders: Add 1 tsp cayenne pepper and 1 tsp hot sauce to your pickle brine. Use hot pickle brine if you have it. Add a pinch of cayenne to the panko too.
- 🌾 Gluten-Free: Swap all-purpose flour for a 1:1 gluten-free flour blend and use gluten-free panko breadcrumbs. The result is just as crispy.
- 🥛 Buttermilk + Pickle Combo: Mix ½ cup buttermilk with ½ cup pickle brine for an ultra-creamy, tangy brine that gives an even more tender result.
- 🧀 Parmesan Panko Crust: Replace ¼ cup of the panko with finely grated Parmesan. It adds a nutty, salty flavor and an extra-golden crust.
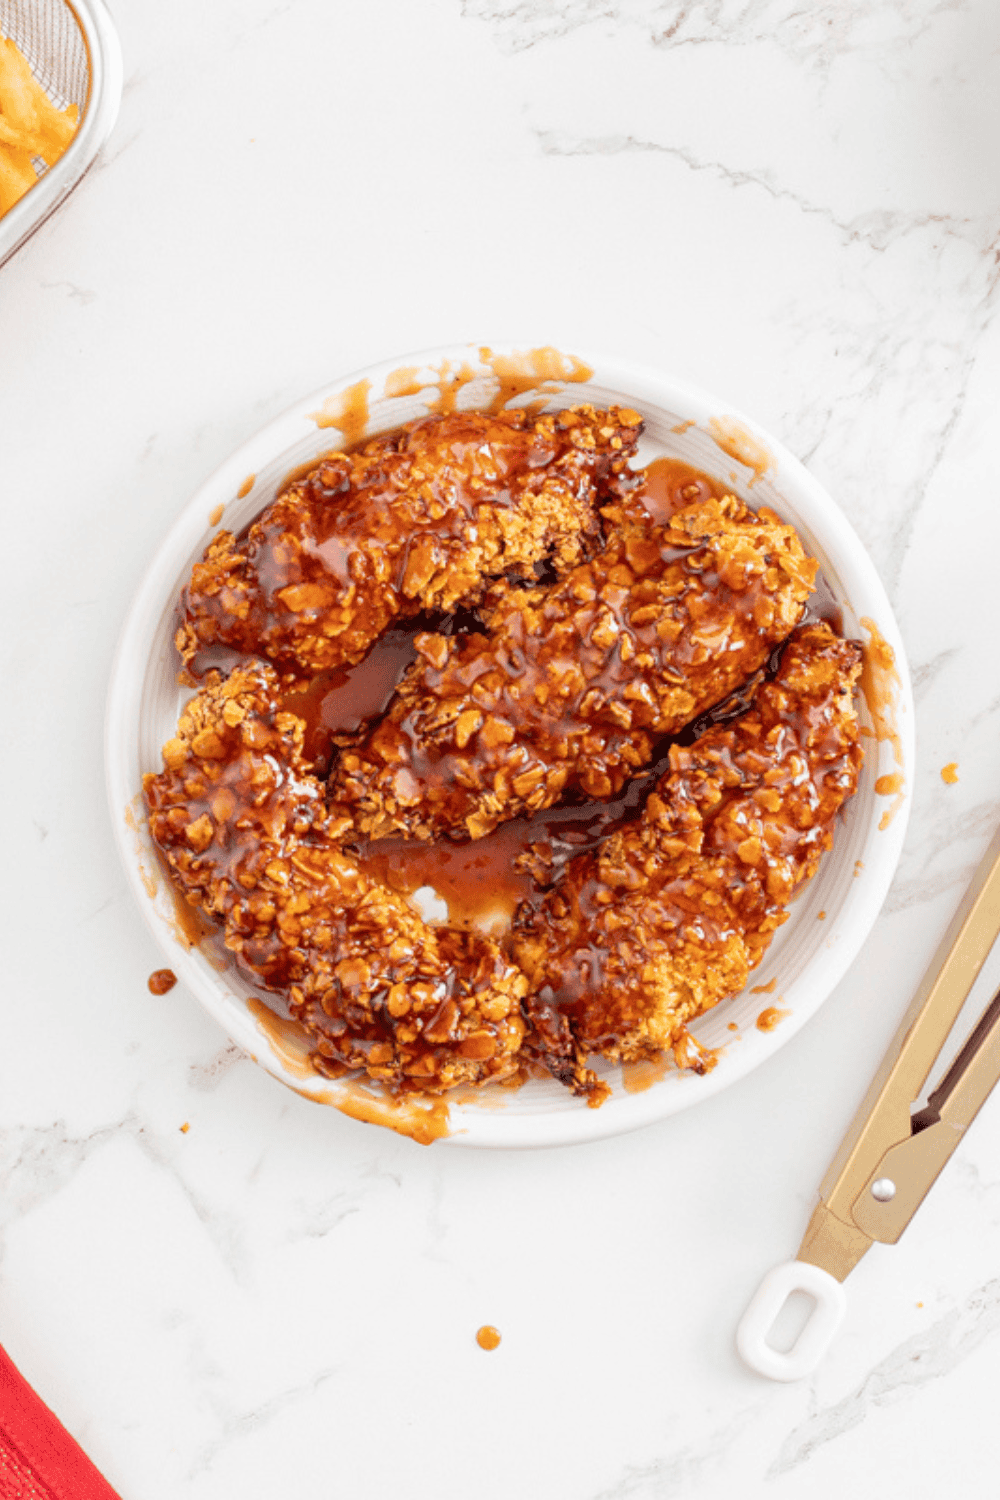
- 🍯 Sweet Pickle Brine: Use brine from bread-and-butter pickles for a subtly sweet, tangy flavor. Pairs beautifully with honey mustard dipping sauce.
- 🐔 Chicken Breast Version: Cut chicken breasts into 1-inch wide strips. Brine and bread the same way — just add 2–3 minutes of cook time and check the temp.
What to Serve With Pickle Brined Chicken Tenders
🥗 Dipping Sauces
- Buffalo sauce + blue cheese
- Dill pickle buttermilk ranch (the perfect pairing)
- Classic honey mustard
- Spicy sriracha mayo
- BBQ sauce
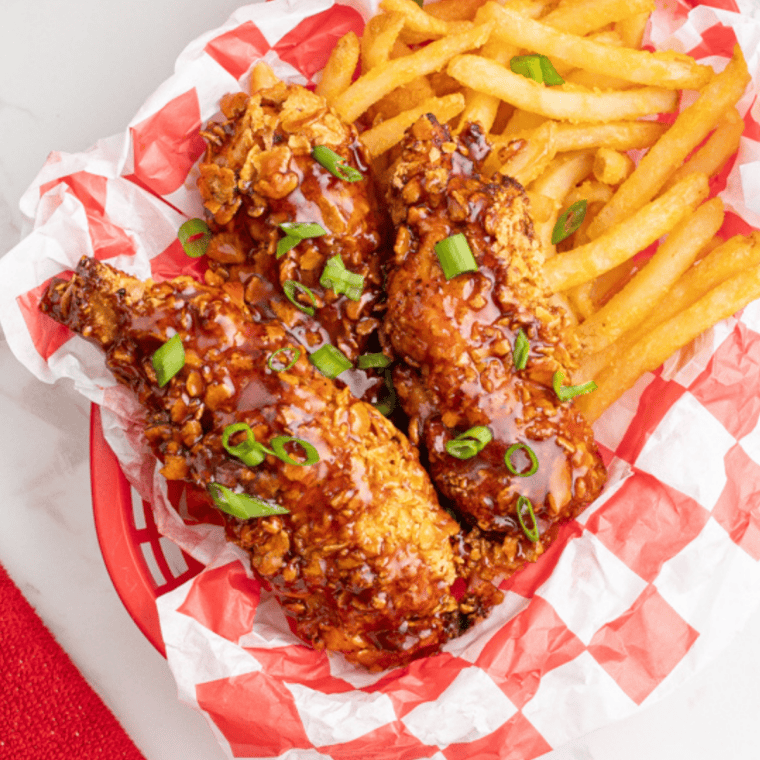
🍟 Side Dishes
- Air fryer French fries or waffle fries
- Coleslaw (the tang pairs perfectly)
- Mac and cheese
- Roasted mini potatoes
- Simple green salad
These tenders also make an incredible base for other meals — slice them up over a Caesar salad, stuff them into a wrap with lettuce and pickles, or serve them in slider buns with your favorite sauce for a crowd-pleasing appetizer.

How to Store & Reheat Leftovers
🧊 Storage
- Fridge: Airtight container, up to 3 days
- Freezer: Freeze in a single layer on a baking sheet first, then transfer to a freezer bag. Up to 2 months.
- Do not store in a sealed container while still warm — the steam will soften the crust
🔥 Reheating (Stay Crispy!)
- Air fryer (best): 350°F for 4–5 minutes, no need to flip
- Oven: 375°F on a wire rack for 8–10 minutes
- From frozen: Air fryer at 380°F for 8–10 minutes, flipping once
- Microwave: Works but the crust will soften — use only as a last resort
Frequently Asked Questions
Can I use any type of pickle juice, or does it have to be dill? Dill pickle brine is the classic choice and gives you that savory, tangy result. But you can absolutely experiment — bread-and-butter pickle brine gives a sweeter flavor, and spicy pickle brine adds heat. Whatever pickles you enjoy eating, their brine will work for this recipe.
Do my chicken tenders taste like pickles when they’re done? No, and this surprises most people! The brine adds a subtle, savory depth and makes the chicken juicy, but the finished tenders don’t taste “pickle-y.” Think of it as a background note of brightness rather than a front-and-center pickle flavor.
Can I brine the chicken for longer than 24 hours? It’s best to stay within the 24-hour window. The acid in the brine is gentle, but beyond 24 hours it can start to break down the texture of the meat, making it slightly mushy rather than tender. Set a timer if you’re concerned about forgetting!
I don’t have enough pickle brine to submerge the tenders — can I add water? Yes! Mix your pickle brine with a small amount of water (up to a 50/50 ratio) to extend it. You can also add a pinch of salt and a splash of white vinegar to the water portion to maintain the brine’s effectiveness. Alternatively, place the tenders in a zip-lock bag — they’ll brine in far less liquid than an open dish.
Can I make these with frozen chicken tenders? For this recipe, fresh chicken tenders give the best result because the brine needs to penetrate the meat. If you’re starting with frozen tenders, thaw them completely in the refrigerator first, then proceed with the brine. Do not brine frozen chicken — the brine can’t penetrate frozen meat effectively.
How do I prevent the breading from sticking to the air fryer basket? Always spray the basket with cooking spray before adding the tenders, and spray the tops of the tenders too. If your air fryer basket tends to stick, you can also place a piece of perforated parchment paper in the bottom of the basket.
What’s the internal temperature chicken tenders need to reach? Chicken must reach an internal temperature of 165°F (74°C) to be safe to eat. Use an instant-read meat thermometer inserted into the thickest part of the tender — this is far more reliable than relying on cook time alone since air fryer models vary significantly.
Can I use this same brine method for other cuts of chicken? Absolutely. Chicken breasts, thighs, and even bone-in pieces all benefit from a pickle brine. Increase the brine time for thicker cuts — chicken breasts can go the full 24 hours. This technique also works wonderfully for pork chops.

More Air Fryer Chicken Recipes You’ll Love
Air Fryer Buttermilk Chicken Tenders
Doritos Air Fryer Chicken Tenders
Air Fryer Easy Chicken Tenders For Kids
Copycat Chick-Fil-A Chicken Nuggets
Share Your Creations! Are you active on Facebook? Join our Air Fryer Recipes Group, where hundreds of thousands of Air Fryer enthusiasts gather and share your photos! I’m always thrilled to see what you’ve made. For those on Instagram, don’t forget to tag me @forktospoon – I can’t wait to admire your culinary adventures!

Air Fryer Pickle Brined Chicken Tenders
Description
Ingredients
- 1½ lbs chicken tenders, or chicken breasts cut into strips
- 1 CUP dill pickle brine, from any jar of dill pickles
- ¾ cup all-purpose flour
- 2 large eggs, beaten
- 1 cup panko breadcrumbs
- 1 tsp paprika
- 1 tsp garlic powder
- ½ tsp onion powder
- ½ tsp black pepper
- ½ tsp salt
Instructions
- Place chicken tenders in a shallow dish or zip-lock bag. Pour pickle brine over them until fully submerged. Cover and refrigerate for 6–24 hours. (Overnight is ideal.)
- Remove tenders from brine and pat completely dry with paper towels on all sides. Don’t skip this step.
- Preheat air fryer to 400°F (200°C) for 5 minutes.
- Set up three shallow dishes: flour in the first, beaten eggs in the second, and panko mixed with paprika, garlic powder, onion powder, salt, and pepper in the third.
- Dredge each tender in flour (shake off excess), dip in egg (let excess drip), then press firmly into seasoned panko to coat all sides.
- Spray the air fryer basket with cooking spray. Arrange tenders in a single layer. Spray the tops generously with cooking spray.
- Air fry at 400°F for 5–6 minutes. Flip each tender, spray the tops again, and cook for another 5–6 minutes until golden and crispy.
- Check internal temperature — it must reach 165°F (74°C). Rest for 2–3 minutes before serving.
- Serve immediately with your favorite dipping sauce.
Equipment
- Cooking Spray
- Parchment Paper, optional
Notes
Nutrition
Share this recipe
We can’t wait to see what you’ve made! Mention @forktospoon or tag #forktospoon!


Susan Bauer
The ingredient list says nothing about the egg.